Saunders Recorders
Bristol UK
Yamaha Plastic Key Issues

See the bottom of this page for comments on pad issues.
It is a long time since Yamaha closed my account and I no longer feel obliged to provide service to Yamaha instruments unless they belong to established clients or came from me originally. As cheap copies of Yamaha instruments come flooding onto the market the demand for their service is beginning to outstrip my supply of goodwill! Your first call should be to your supplier.
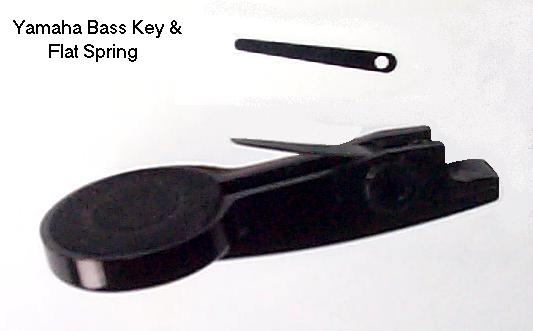
Springs are sized and 'generic'. You should be able to get something suitable from a big woodwind dealer or spares supplier. What you need to replace the body key spring is a 'thin flat spring 19mm. long'. If such a part is not immediately available a longer one can be cut down. Suitable standard parts that can be shortened are a 'speaker key' spring for a clarinet or a 'thumb key' spring for a flute. I have always found Wind Craft Ltd to be helpful and to have stock of everything that I have needed.
To replace the spring of a Yamaha Plastic Bass (YRB302B) you need small screwdrivers, preferably cross point as well as straight, a small pair of pliers, and a little patience.
Make a small (about 30 degree) bend in the spring about 2mm up from the hole. The bend must be at right angles to the line of the spring. Do it tidily using a pair of pliers to grip the short end of the spring. (Hold the spring in line with the pliers.) If I have supplied the spring, I will have done this for you.
Remove the axle screw holding the key cup lever. Use the biggest straight screwdriver which you can make fit. The screw may be tight and it has to come out. If the slot is spoiled by the wrong size tool the battle is lost. The axle must be turned, but it may not unscrew. If it does not unscrew itself out help it by pressure on the far end with a smaller screwdriver. Careful use of the pliers may be necessary, do not damage the body of the axle. Put the axle somewhere safe. Back in the hole is a good place.
Remove the remaining vestige of broken spring by unscrewing the cross head screw completely. A cross head screwdriver is best, but not essential. Be very careful not to lose this tiny screw. The screw and spring are steel and may well tend to stick to your screwdriver.
Fit the new spring with the long end pointing towards and above the pad. (This is where you will be glad you kept track of the screw.) This is tricky. Fit the screw into the hole in the spring. Offer it up to the key by holding the spring so that the screw dangles into the hole. If you let the spring touch the key near the hole the screw will take fright jump out of the hole and run away. Tighten the screw fully, but not forcefully.
Refit the lever with the axle. It will only fit one way round, the same way as the axle you have not removed. Look for the slot in the end.
Apply a drop of oil each side of the levers, where they move between the cheeks. A small blob of grease (cork grease will do) applied to the spot where the levers touch each other, and where the spring runs on the plastic, will keep the action quiet and reduce wear. While you are at it, do the same for all the keys on the instrument.
Job done. Five minutes with practice, allow much more time for the first one.
~~~~~~~~~~~~~~~~~~~~~~~~~~~~~~~~~~~~~~~~~~~~~~~~~~~~~
I was once presented with a brand new Yamaha bass (purchased over the internet) that hardly played. Only extreme finger pressure would produce anything approaching a good sound. I traced the problem to one of the keys having a pad that was not thick enough to work properly. These pads are pressure adhesive backed synthetic foam and usually only give problems when they are very old. The quick and easy answer was to pack it out. A single thickness of a standard sticky label (you may even have some coloured 'stickers' of the right diameter) was all that was needed. With care the original pad can be peeled out of the cup, and replaced on top of a disc of paper. If you use a sticky label there is no need to tangle with any glue. There is more on the subject of pads here ![]() .
.
The foot keys of this recorder were stiff and did not want to move separately. I'm not sure why. After taking them off and re-fitting them all was well. I guess it was a speck of grit or something similar stuck between the moving parts